
Git 与 Perforce
在企业环境中 Perforce 是非常流行的版本管理系统。 它大概起始于 1995 年,这使它成为了本章中介绍的最古老的系统。 就其本身而言,它设计时带有当时时代的局限性;它假定你始终连接到一个单独的中央服务器,本地磁盘只保存一个版本。 诚然,它的功能与限制适合几个特定的问题,但实际上,在很多情况下,将使用 Perforce 的项目换做使用 Git 会更好。
如果你决定混合使用 Perforce 与 Git 这里有两种选择。 第一个我们要介绍的是 Perforce 官方制作的 “Git Fusion” 桥接,它可以将 Perforce 仓库中的子树表示为一个可读写的 Git 仓库。 第二个是 git-p4,一个客户端桥接允许你将 Git 作为 Perforce 的客户端使用,而不用在 Perforce 服务器上做任何重新的配置。
Git Fusion
Perforce 提供了一个叫作 Git Fusion 的产品(可在 http://www.perforce.com/git-fusion 获得),它将会在服务器这边同步 Perforce 服务器与 Git 仓库。
====== 设置
针对我们的例子,我们将会使用最简单的方式安装 Git Fusion:下载一个虚拟机来运行 Perforce 守护进程与 Git Fusion。 可以从 http://www.perforce.com/downloads/Perforce/20-User 获得虚拟机镜像,下载完成后将它导入到你最爱的虚拟机软件中(我们将会使用 VirtualBox)。
在第一次启动机器后,它会询问你自定义三个 Linux 用户(root、perforce 与 git)的密码, 并且提供一个实例名字来区分在同一网络下不同的安装。当那些都完成后,将会看到这样:
Git Fusion 虚拟机启动屏幕。
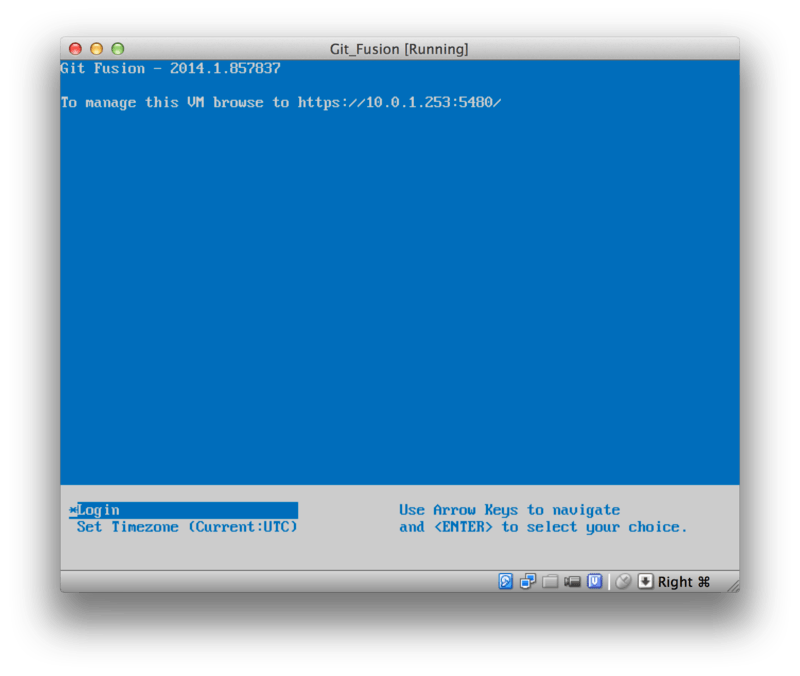
应当注意显示在这儿的 IP 地址,我们将会在后面用到。 接下来,我们将会创建一个 Perforce 用户。 选择底部的 “Login” 选项并按下回车(或者用 SSH 连接到这台机器),然后登录为 root。 然后使用这些命令创建一个用户:
$ p4 -p localhost:1666 -u super user -f john
$ p4 -p localhost:1666 -u john passwd
$ exit
第一个命令将会打开一个 VI 编辑器来自定义用户,但是可以通过输入 :wq 并回车来接受默认选项。 第二个命令将会提示输入密码两次。 这就是所有我们要通过终端提示符做的事情,所以现在可以退出当前会话了。
接下来要做的事就是告诉 Git 不要验证 SSL 证书。 Git Fusion 镜像内置一个证书,但是域名并不匹配你的虚拟主机的 IP 地址,所以 Git 会拒绝 HTTPS 连接。 如果要进行永久安装,查阅 Perforce Git Fusion 手册来安装一个不同的证书;然而,对于我们这个例子来说,这已经足够了。
$ export GIT_SSL_NO_VERIFY=true现在我们可以测试所有东西是不是正常工作。
$ git clone https://10.0.1.254/Talkhouse
Cloning into 'Talkhouse'...
Username for 'https://10.0.1.254': john
Password for 'https://john@10.0.1.254':
remote: Counting objects: 630, done.
remote: Compressing objects: 100% (581/581), done.
remote: Total 630 (delta 172), reused 0 (delta 0)
Receiving objects: 100% (630/630), 1.22 MiB | 0 bytes/s, done.
Resolving deltas: 100% (172/172), done.
Checking connectivity... done.
虚拟机镜像自带一个可以克隆的样例项目。 这里我们会使用之前创建的 john 用户,通过 HTTPS 进行克隆;Git 询问此次连接的凭证,但是凭证缓存会允许我们跳过这步之后的任意后续请求。
====== Fusion 配置
一旦安装了 Git Fusion,你会想要调整配置。 使用你最爱的 Perforce 客户端做这件事实际上相当容易;只需要映射 Perforce 服务器上的 //.git-fusion 目录到你的工作空间。 文件结构看起来像这样:
$ tree
.
├── objects
│   ├── repos
│   │   └── [...]
│   └── trees
│       └── [...]
│
├── p4gf_config
├── repos
│   └── Talkhouse
│       └── p4gf_config
└── users
    └── p4gf_usermap

498 directories, 287 files
objects 目录被 Git Fusion 内部用来双向映射 Perforce 对象与 Git 对象,你不必弄乱那儿的任何东西。 在这个目录中有一个全局的 p4gf_config 文件,每个仓库中也会有一份——这些配置文件决定了 Git Fusion 的行为。 让我们看一下根目录下的文件:
[repo-creation]
charset = utf8

[git-to-perforce]
change-owner = author
enable-git-branch-creation = yes
enable-swarm-reviews = yes
enable-git-merge-commits = yes
enable-git-submodules = yes
preflight-commit = none
ignore-author-permissions = no
read-permission-check = none
git-merge-avoidance-after-change-num = 12107

[perforce-to-git]
http-url = none
ssh-url = none

[@features]
imports = False
chunked-push = False
matrix2 = False
parallel-push = False

[authentication]
email-case-sensitivity = no
这里我们并不会深入介绍这些选项的含义,但是要注意这是一个 INI 格式的文本文件,就像 Git 的配置。 这个文件指定了全局选项,但它可以被仓库特定的配置文件覆盖,像是 repos/Talkhouse/p4gf_config。 如果打开这个文件,你会看到有一些与全局默认不同设置的 [@repo] 区块。 你也会看到像下面这样的区块:
[Talkhouse-master]
git-branch-name = master
view = //depot/Talkhouse/main-dev/... ...
这是一个 Perforce 分支与一个 Git 分支的映射。 这个区块可以被命名成你喜欢的名字,只要保证名字是唯一的即可。 git-branch-name 允许你将在 Git 下显得笨重的仓库路径转换为更友好的名字。 view 选项使用标准视图映射语法控制 Perforce 文件如何映射到 Git 仓库。 可以指定一个以上的映射,就像下面的例子:
[multi-project-mapping]
git-branch-name = master
view = //depot/project1/main/... project1/...
       //depot/project2/mainline/... project2/...
通过这种方式,如果正常工作空间映射包含对目录结构的修改,可以将其复制为一个 Git 仓库。
最后一个我们讨论的文件是 users/p4gf_usermap,它将 Perforce 用户映射到 Git 用户,但你可能不会需要它。 当从一个 Perforce 变更集转换为一个 Git 提交时,Git Fusion 的默认行为是去查找 Perforce 用户,然后把邮箱地址与全名存储在 Git 的 author/commiter 字段中。 当反过来转换时,默认的行为是根据存储在 Git 提交中 author 字段中的邮箱地址来查找 Perforce 用户,然后以该用户提交变更集(以及权限的应用)。 大多数情况下,这个行为工作得很好,但是考虑下面的映射文件:
john john@example.com "John Doe"
john johnny@appleseed.net "John Doe"
bob employeeX@example.com "Anon X. Mouse"
joe employeeY@example.com "Anon Y. Mouse"
每一行的格式都是 <user> <email> "<full name>",创建了一个单独的用户映射。 前两行映射不同的邮箱地址到同一个 Perforce 用户账户。 当使用几个不同的邮箱地址(或改变邮箱地址)生成 Git 提交并且想要让他们映射到同一个 Perforce 用户时这会很有用。 当从一个 Perforce 变更集创建一个 Git 提交时,第一个匹配 Perforce 用户的行会被用作 Git 作者信息。
最后两行从创建的 Git 提交中掩盖了 Bob 与 Joe 的真实名字与邮箱地址。 当你想要将一个内部项目开源,但不想将你的雇员目录公布到全世界时这很不错。 注意邮箱地址与全名需要是唯一的,除非想要所有的 Git 提交都属于一个虚构的作者。
====== 工作流程
Perforce Git Fusion 是在 Perforce 与 Git 版本控制间双向的桥接。 让我们看一下在 Git 这边工作是什么样的感觉。 假定我们在 “Jam” 项目中使用上述的配置文件映射了,可以这样克隆:
$ git clone https://10.0.1.254/Jam
Cloning into 'Jam'...
Username for 'https://10.0.1.254': john
Password for 'https://john@10.0.1.254':
remote: Counting objects: 2070, done.
remote: Compressing objects: 100% (1704/1704), done.
Receiving objects: 100% (2070/2070), 1.21 MiB | 0 bytes/s, done.
remote: Total 2070 (delta 1242), reused 0 (delta 0)
Resolving deltas: 100% (1242/1242), done.
Checking connectivity... done.
$ git branch -a
* master
  remotes/origin/HEAD -> origin/master
  remotes/origin/master
  remotes/origin/rel2.1
$ git log --oneline --decorate --graph --all
* 0a38c33 (origin/rel2.1) Create Jam 2.1 release branch.
| * d254865 (HEAD, origin/master, origin/HEAD, master) Upgrade to latest metrowerks on Beos -- the Intel one.
| * bd2f54a Put in fix for jam's NT handle leak.
| * c0f29e7 Fix URL in a jam doc
| * cc644ac Radstone's lynx port.
[...]
当首次这样做时,会花费一些时间。 这里发生的是 Git Fusion 会将在 Perforce 历史中所有合适的变更集转换为 Git 提交。 这发生在服务器端本地,所以会相当快,但是如果有很多历史,那么它还是会花费一些时间。 后来的抓取会做增量转换,所以会感觉更像 Git 的本地速度。
如你所见,我们的仓库看起来像之前使用过的任何一个 Git 仓库了。 这里有三个分支,Git 已经帮助创建了一个跟踪 origin/master 的本地 master 分支。 让我们做一些工作,创建几个新提交:
# ...
$ git log --oneline --decorate --graph --all
* cfd46ab (HEAD, master) Add documentation for new feature
* a730d77 Whitespace
* d254865 (origin/master, origin/HEAD) Upgrade to latest metrowerks on Beos -- the Intel one.
* bd2f54a Put in fix for jam's NT handle leak.
[...]
我们有两个新提交。 现在我们检查下是否有其他人在工作:
$ git fetch
remote: Counting objects: 5, done.
remote: Compressing objects: 100% (3/3), done.
remote: Total 3 (delta 2), reused 0 (delta 0)
Unpacking objects: 100% (3/3), done.
From https://10.0.1.254/Jam
   d254865..6afeb15  master     -> origin/master
$ git log --oneline --decorate --graph --all
* 6afeb15 (origin/master, origin/HEAD) Update copyright
| * cfd46ab (HEAD, master) Add documentation for new feature
| * a730d77 Whitespace
|/
* d254865 Upgrade to latest metrowerks on Beos -- the Intel one.
* bd2f54a Put in fix for jam's NT handle leak.
[...]
看起来有人在工作! 从这个视图来看你并不知道这点,但是 6afeb15 提交确实是使用 Perforce 客户端创建的。 从 Git 的视角看它仅仅只是另一个提交,准确地说是一个点。 让我们看看 Perforce 服务器如何处理一个合并提交:
$ git merge origin/master
Auto-merging README
Merge made by the 'recursive' strategy.
 README | 2 +-
 1 file changed, 1 insertion(+), 1 deletion(-)
$ git push
Counting objects: 9, done.
Delta compression using up to 8 threads.
Compressing objects: 100% (9/9), done.
Writing objects: 100% (9/9), 917 bytes | 0 bytes/s, done.
Total 9 (delta 6), reused 0 (delta 0)
remote: Perforce: 100% (3/3) Loading commit tree into memory...
remote: Perforce: 100% (5/5) Finding child commits...
remote: Perforce: Running git fast-export...
remote: Perforce: 100% (3/3) Checking commits...
remote: Processing will continue even if connection is closed.
remote: Perforce: 100% (3/3) Copying changelists...
remote: Perforce: Submitting new Git commit objects to Perforce: 4
To https://10.0.1.254/Jam
   6afeb15..89cba2b  master -> master
Git 认为它成功了。 让我们从 Perforce 的视角看一下 README 文件的历史,使用 p4v 的版本图功能。
Git 推送后的 Perforce 版本图
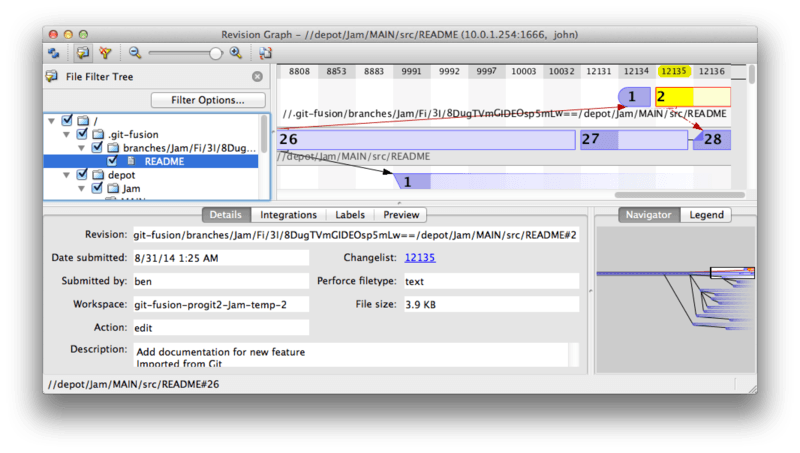
如果你在之前从未看过这个视图,它似乎让人困惑,但是它显示出了作为 Git 历史图形化查看器相同的概念。 我们正在查看 README 文件的历史,所以左上角的目录树只显示那个文件在不同分支的样子。 右上方,我们有不同版本文件关系的可视图,这个可视图的全局视图在右下方。 视图中剩余的部分显示出选择版本的详细信息(在这个例子中是 2)
还要注意的一件事是这个图看起来很像 Git 历史中的图。 Perforce 没有存储 1 和 2 提交的命名分支,所以它在 .git-fusion 目录中生成了一个 “anonymous” 分支来保存它。 这也会在 Git 命名分支不对应 Perforce 命名分支时发生(稍后你可以使用配置文件来映射它们到 Perforce 分支)。
这些大多数发生在后台,但是最终结果是团队中的一个人可以使用 Git,另一个可以使用 Perforce,而所有人都不知道其他人的选择。
====== Git-Fusion 总结
如果你有(或者能获得)接触你的 Perforce 服务器的权限,那么 Git Fusion 是使 Git 与 Perforce 互相交流的很好的方法。 这里包含了一点配置,但是学习曲线并不是很陡峭。 这是本章中其中一个不会出现无法使用 Git 全部能力的警告的章节。 这并不是说扔给 Perforce 任何东西都会高兴——如果你尝试重写已经推送的历史,Git Fusion 会拒绝它——虽然 Git Fusion 尽力让你感觉是原生的。 你甚至可以使用 Git 子模块(尽管它们对 Perforce 用户看起来很奇怪),合并分支(在 Perforce 这边会被记录了一次整合)。
如果不能说服你的服务器管理员设置 Git Fusion,依然有一种方式来一起使用这两个工具。
Git-p4
Git-p4 是 Git 与 Perforce 之间的双向桥接。 它完全运行在你的 Git 仓库内,所以你不需要任何访问 Perforce 服务器的权限(当然除了用户验证)。 Git-p4 并不像 Git Fusion 一样灵活或完整,但是它允许你在无需修改服务器环境的情况下,做大部分想做的事情。
TIP
为了与 git-p4 一起工作需要在你的 PATH 环境变量中的某个目录中有 p4 工具。 在写这篇文章的时候,它可以在 http://www.perforce.com/downloads/Perforce/20-User 免费获得。
====== 设置
出于演示的目的,我们将会从上面演示的 Git Fusion OVA 运行 Perforce 服务器,但是我们会绕过 Git Fusion 服务器然后直接进行 Perforce 版本管理。
为了使用 p4 命令行客户端(git-p4 依赖项),你需要设置两个环境变量:
$ export P4PORT=10.0.1.254:1666
$ export P4USER=john
====== 开始
像在 Git 中的任何事情一样,第一个命令就是克隆:
$ git p4 clone //depot/www/live www-shallow
Importing from //depot/www/live into www-shallow
Initialized empty Git repository in /private/tmp/www-shallow/.git/
Doing initial import of //depot/www/live/ from revision #head into refs/remotes/p4/master
这样会创建出一种在 Git 中名为 “shallow” 的克隆;只有最新版本的 Perforce 被导入至 Git;记住,Perforce 并未被设计成给每一个用户一个版本。 使用 Git 作为 Perforce 客户端这样就足够了,但是为了其他目的的话这样可能不够。
完成之后,我们就有一个全功能的 Git 仓库:
$ cd myproject
$ git log --oneline --all --graph --decorate
* 70eaf78 (HEAD, p4/master, p4/HEAD, master) Initial import of //depot/www/live/ from the state at revision #head
注意有一个 “p4” 远程代表 Perforce 服务器,但是其他东西看起来就像是标准的克隆。 实际上,这有一点误导:其实远程仓库并不存在。
$ git remote -v在当前仓库中并不存在任何远程仓库。 Git-p4 创建了一些引用来代表服务器的状态,它们看起来类似 git log 显示的远程引用,但是它们并不被 Git 本身管理,并且你无法推送它们。
====== 工作流程
好了,让我们开始一些工作。 假设你已经在一个非常重要的功能上做了一些工作,然后准备好将它展示给团队中的其他人。
$ git log --oneline --all --graph --decorate
* 018467c (HEAD, master) Change page title
* c0fb617 Update link
* 70eaf78 (p4/master, p4/HEAD) Initial import of //depot/www/live/ from the state at revision #head
我们已经生成了两次新提交并已准备好推送它们到 Perforce 服务器。 让我们检查一下今天其他人是否做了一些工作:
$ git p4 sync
git p4 sync
Performing incremental import into refs/remotes/p4/master git branch
Depot paths: //depot/www/live/
Import destination: refs/remotes/p4/master
Importing revision 12142 (100%)
$ git log --oneline --all --graph --decorate
* 75cd059 (p4/master, p4/HEAD) Update copyright
| * 018467c (HEAD, master) Change page title
| * c0fb617 Update link
|/
* 70eaf78 Initial import of //depot/www/live/ from the state at revision #head看起来他们做了,master 与 p4/master 已经分叉了。 Perforce 的分支系统一点也 不 像 Git 的,所以提交合并提交没有任何意义。 Git-p4 建议变基你的提交,它甚至提供了一个快捷方式来这样做:
$ git p4 rebase
Performing incremental import into refs/remotes/p4/master git branch
Depot paths: //depot/www/live/
No changes to import!
Rebasing the current branch onto remotes/p4/master
First, rewinding head to replay your work on top of it...
Applying: Update link
Applying: Change page title
 index.html | 2 +-
1 file changed, 1 insertion(+), 1 deletion(-)从输出中可能大概得知,git p4 rebase 是 git p4 sync 接着 git rebase p4/master 的快捷方式。 它比那更聪明一些,特别是工作在多个分支时,但这是一个进步。
现在我们的历史再次是线性的,我们准备好我们的改动贡献回 Perforce。 git p4 submit 命令会尝试在 p4/master 与 master 之间的每一个 Git 提交创建一个新的 Perforce 修订版本。 运行它会带我们到最爱的编辑器,文件内容看起来像是这样:
# A Perforce Change Specification.
#
#  Change:      The change number. 'new' on a new changelist.
#  Date:        The date this specification was last modified.
#  Client:      The client on which the changelist was created.  Read-only.
#  User:        The user who created the changelist.
#  Status:      Either 'pending' or 'submitted'. Read-only.
#  Type:        Either 'public' or 'restricted'. Default is 'public'.
#  Description: Comments about the changelist.  Required.
#  Jobs:        What opened jobs are to be closed by this changelist.
#               You may delete jobs from this list.  (New changelists only.)
#  Files:       What opened files from the default changelist are to be added
#               to this changelist.  You may delete files from this list.
#               (New changelists only.)

Change:  new

Client:  john_bens-mbp_8487

User: john

Status:  new

Description:
   Update link

Files:
   //depot/www/live/index.html   # edit


######## git author ben@straub.cc does not match your p4 account.
######## Use option --preserve-user to modify authorship.
######## Variable git-p4.skipUserNameCheck hides this message.
######## everything below this line is just the diff #######
--- //depot/www/live/index.html  2014-08-31 18:26:05.000000000 0000
+++ /Users/ben/john_bens-mbp_8487/john_bens-mbp_8487/depot/www/live/index.html   2014-08-31 18:26:05.000000000 0000
@@ -60,7 +60,7 @@
 </td>
 <td valign=top>
 Source and documentation for
-<a href="http://www.perforce.com/jam/jam.html">
+<a href="jam.html">
 Jam/MR</a>,
 a software build tool.
 </td>
除了结尾 git-p4 给我们的帮助性的提示,其它的与你运行 p4 submit 后看到的内容大多相同。 当提交或变更集需要一个名字时 git-p4 会分别尝试使用你的 Git 与 Perforce 设置,但是有些情况下你会想要覆盖默认行为。 例如,如果你正导入的提交是由没有 Perforce 用户账户的贡献者编写的,你还是会想要最终的变更集看起来像是他们写的(而不是你)。
Git-p4 帮助性地将 Git 的提交注释导入到 Perforce 变更集的内容,这样所有我们必须做的就是保存并退出,两次(每次一个提交)。 这会使 shell 输出看起来像这样:
$ git p4 submit
Perforce checkout for depot path //depot/www/live/ located at /Users/ben/john_bens-mbp_8487/john_bens-mbp_8487/depot/www/live/
Synchronizing p4 checkout...
... - file(s) up-to-date.
Applying dbac45b Update link
//depot/www/live/index.html#4 - opened for edit
Change 12143 created with 1 open file(s).
Submitting change 12143.
Locking 1 files ...
edit //depot/www/live/index.html#5
Change 12143 submitted.
Applying 905ec6a Change page title
//depot/www/live/index.html#5 - opened for edit
Change 12144 created with 1 open file(s).
Submitting change 12144.
Locking 1 files ...
edit //depot/www/live/index.html#6
Change 12144 submitted.
All commits applied!
Performing incremental import into refs/remotes/p4/master git branch
Depot paths: //depot/www/live/
Import destination: refs/remotes/p4/master
Importing revision 12144 (100%)
Rebasing the current branch onto remotes/p4/master
First, rewinding head to replay your work on top of it...
$ git log --oneline --all --graph --decorate
* 775a46f (HEAD, p4/master, p4/HEAD, master) Change page title
* 05f1ade Update link
* 75cd059 Update copyright
* 70eaf78 Initial import of //depot/www/live/ from the state at revision #head
结果恰如我们只是做了一次 git push,就像是应当实际发生的最接近的类比。
注意在这个过程中每一个 Git 提交都会被转化为一个 Perforce 变更集。 如果想要将它们压缩成为一个单独的提交,可以在运行 git p4 submit 前进行一次交互式变基。 同样注意的是所有被转化为变更集的提交的 SHA-1 校验和都改变了, 这是因为 git-p4 在每一个转化的提交增加一行到提交注释结尾:
$ git log -1
commit 775a46f630d8b46535fc9983cf3ebe6b9aa53145
Author: John Doe <john@example.com>
Date:   Sun Aug 31 10:31:44 2014 -0800

    Change page title

    [git-p4: depot-paths = "//depot/www/live/": change = 12144]
当尝试提交一次合并提交时会发生什么? 让我们尝试一下。 这是我们可能会遇到的一种情形:
$ git log --oneline --all --graph --decorate
* 3be6fd8 (HEAD, master) Correct email address
*   1dcbf21 Merge remote-tracking branch 'p4/master'
|\
| * c4689fc (p4/master, p4/HEAD) Grammar fix
* | cbacd0a Table borders: yes please
* | b4959b6 Trademark
|/
* 775a46f Change page title
* 05f1ade Update link
* 75cd059 Update copyright
* 70eaf78 Initial import of //depot/www/live/ from the state at revision #head
Git 与 Perforce 历史在 775a46f 后分叉了。 Git 这边有两次提交,然后一次与 Perforce 头部的合并提交,还有另一个提交。 我们将会尝试提交这些到 Perforce 那边单独的变更集之上。 让我们看看如果尝试这样提交会发生什么:
$ git p4 submit -n
Perforce checkout for depot path //depot/www/live/ located at /Users/ben/john_bens-mbp_8487/john_bens-mbp_8487/depot/www/live/
Would synchronize p4 checkout in /Users/ben/john_bens-mbp_8487/john_bens-mbp_8487/depot/www/live/
Would apply
  b4959b6 Trademark
  cbacd0a Table borders: yes please
  3be6fd8 Correct email address
-n 标记是 --dry-run 的缩写,将会报告如果提交命令真的运行会发生什么。 这本例中,它看起来像是我们会创建三个 Perforce 变更集,对应着不在 Perforce 服务器端的三次非合并提交。 那听起来像是我们想要的,让我们看看它会如何做:
$ git p4 submit
[…]
$ git log --oneline --all --graph --decorate
* dadbd89 (HEAD, p4/master, p4/HEAD, master) Correct email address
* 1b79a80 Table borders: yes please
* 0097235 Trademark
* c4689fc Grammar fix
* 775a46f Change page title
* 05f1ade Update link
* 75cd059 Update copyright
* 70eaf78 Initial import of //depot/www/live/ from the state at revision #head
我们的历史变成线性了,就像在提交前刚刚变基过(实际上也是这样)。 这意味着你可以在 Git 这边自由地创建、工作、扔掉与合并分支而不用害怕你的历史会变得与 Perforce 不兼容。 如果你可以变基它,你就可以将它贡献到 Perforce 服务器。
如果你的 Perforce 项目有多个分支,你并不会不走运;git-p4 可以以一种类似 Git 的方式来处理那种情况。 假定你的 Perforce 仓库平铺的时候像这样:
//depot
  └── project
      ├── main
      └── dev
并且假定你有一个 dev 分支,有一个视图规格像下面这样:
//depot/project/main/... //depot/project/dev/...Git-p4 可以自动地检测到这种情形并做正确的事情:
$ git p4 clone --detect-branches //depot/project@all
Importing from //depot/project@all into project
Initialized empty Git repository in /private/tmp/project/.git/
Importing revision 20 (50%)
    Importing new branch project/dev

    Resuming with change 20
Importing revision 22 (100%)
Updated branches: main dev
$ cd project; git log --oneline --all --graph --decorate
* eae77ae (HEAD, p4/master, p4/HEAD, master) main
| * 10d55fb (p4/project/dev) dev
| * a43cfae Populate //depot/project/main/... //depot/project/dev/....
|/
* 2b83451 Project init
注意在仓库路径中的 “@all” 说明符;那会告诉 git-p4 不仅仅只是克隆那个子树最新的变更集,更包括那些路径未接触的所有变更集。 这有点类似于 Git 的克隆概念,但是如果你工作在一个具有很长历史的项目,那么它会花费一段时间。
--detect-branches 标记告诉 git-p4 使用 Perforce 的分支规范来映射到 Git 的引用中。 如果这些映射不在 Perforce 服务器中(使用 Perforce 的一种完美有效的方式),你可以告诉 git-p4 分支映射是什么,然后你会得到同样的结果:
$ git init project
Initialized empty Git repository in /tmp/project/.git/
$ cd project
$ git config git-p4.branchList main:dev
$ git clone --detect-branches //depot/project@all .
设置 git-p4.branchList 配置选项为 main:dev 告诉 git-p4 那个 “main” 与 “dev” 都是分支,第二个是第一个的子分支。
如果我们现在运行 git checkout -b dev p4/project/dev 并且做一些提交,在运行 git p4 submit 时 git-p4 会聪明地选择正确的分支。 不幸的是,git-p4 不能混用 shallow 克隆与多个分支;如果你有一个巨型项目并且想要同时工作在不止一个分支上,可能不得不针对每一个你想要提交的分支运行一次 git p4 clone。
为了创建与整合分支,你不得不使用一个 Perforce 客户端。 Git-p4 只能同步或提交已有分支,并且它一次只能做一个线性的变更集。 如果你在 Git 中合并两个分支并尝试提交新的变更集,所有这些会被记录为一串文件修改;关于哪个分支参与的元数据在整合中会丢失。
Git 与 Perforce 总结
Git-p4 将与 Perforce 服务器工作时使用 Git 工作流成为可能,并且它非常擅长这点。 然而,需要记住的重要一点是 Perforce 负责源头,而你只是在本地使用 Git。 在共享 Git 提交时要相当小心:如果你有一个其他人使用的远程仓库,不要在提交到 Perforce 服务器前推送任何提交。
如果想要为源码管理自由地混合使用 Perforce 与 Git 作为客户端,可以说服服务器管理员安装 Git Fusion,Git Fusion 使 Git 作为 Perforce 服务器的首级版本管理客户端。